In a previous article “Increase your Leads with a LinkedIn Company Page“, we showed you how to create a simple company page to help you attract new clients and leads on LinkedIn.
Whether you already have a company page on the site, or simply followed our previous guide to create a basic one, you can make sure you get the best results out of it by following some of the below tips to ensure it is fully optimised for success!
1. Create a Striking Banner
Firstly you should ensure that your company page is equipped with an attractive and professional banner image that best represents your brand to the world.
You may already have done this when setting up a company page for yourself – but you should still take this opportunity to review it and make sure it truly represents you in the best possible light. If your image is blurry, or bland (or you simply don’t feel it looks right for your company) then you should definitely consider replacing it.
To get some ideas, why not have a look at other company pages on the site you think are effective – particularly those in your own industry? After you have decided roughly what your banner should look like it is possible to use a variety of free – or low-cost-online to design it yourself. You can find free images on websites such as www.Pexels.com and, if you want to play around with these and add your own text and effects then online design sites such as www.Canva.com will enable you to do so with relative ease.
To add a new image or update an old one you need to click on the pencil icon that appears on the top right of the blank placeholder that appears where your image should go.
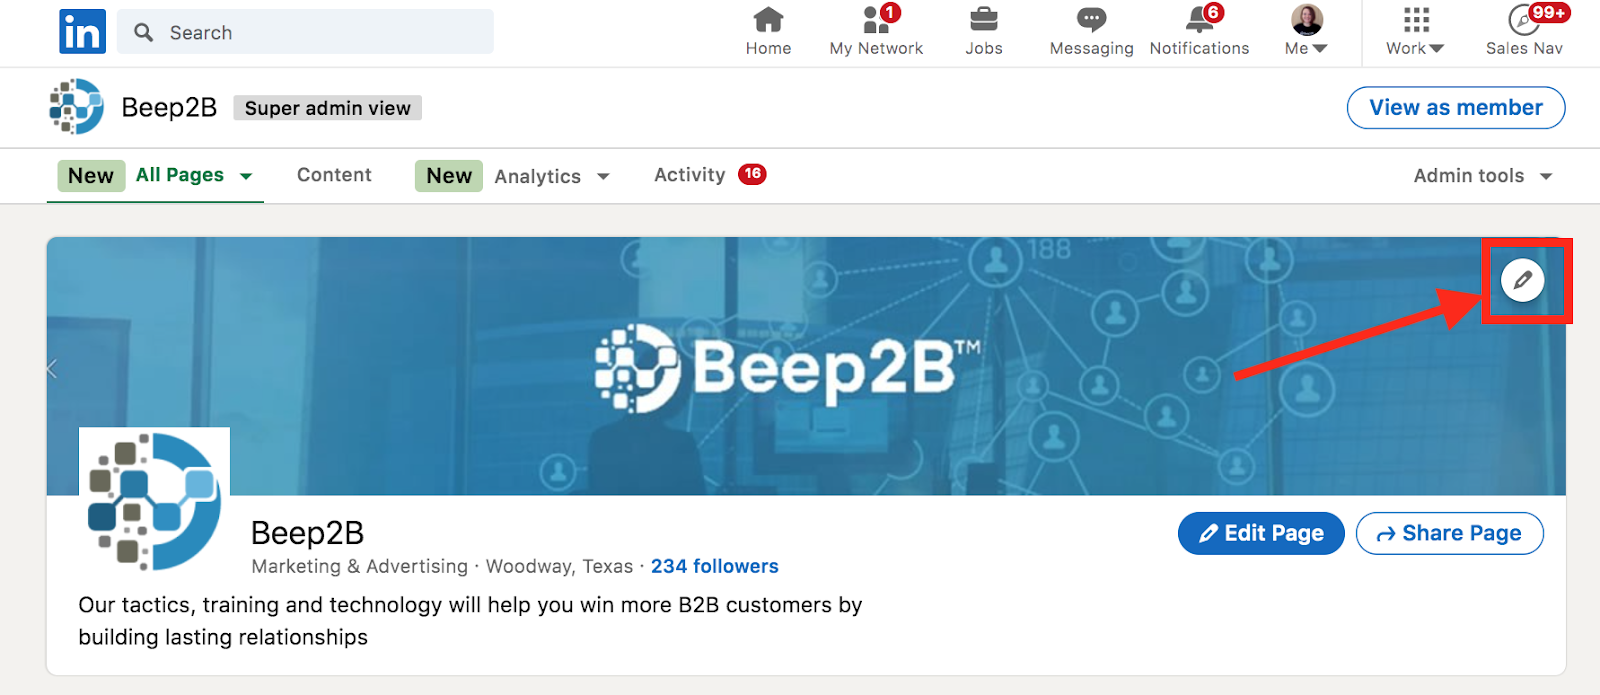
You will then be able to upload a new image or else reposition or delete an existing one. Remember your image should ideally measure1536 x 768 pixels so make sure that you have created something that looks sharp and crisp at this size.
2. Show-Off Your Business With A Fantastic Description
After you have added a great image – or updated an existing one – the next step is to add a compelling description to your page. LinkedIn sets a limit of 2,000 characters for this and, as this isn’t a lot of words to really sell yourself with (approximately 600), we would strongly advise that you get as close to this limit as possible!
This is a great way to let your potential clients know about what sets you apart from others in your field. Some suggestions would be to talk about problems you have solved for clients in the past, value you have added for clients and what your ideal client might look like.
Make sure you don’t forget to include the key information that clients need to see as well: describe what your company is and what it does and highlight the key benefits customers enjoy by choosing to do business with you over your competitors.
Remember, the description is often the place where interested prospects will first look in order to get a better feel for your business and what you do, so getting it right can mean the difference between a lead and a new client!
3. Increase Your Visibility With Copy
Now that you have created a banner and description for your company page, you will want to ensure that new prospects will be attracted to it. The best way to do this – as with your personal profile – is to start posting engaging copy that proves your credibility and knowledge and helps to show that you really know what you’re talking about!
Whilst you might share more personal or opinionated pieces on your personal page, this is probably not appropriate content to post on behalf of your company. Instead, the content you post here should be of a strictly professional nature and should all be relevant to your business and areas of expertise.
One way you could help to achieve the desired professional image for your company is by pinning a ’showcase’ article to the top of your company page. This will allow you to give new visitors the best possible impression of your company and tell them what it is all about. Alternatively, it might simply be the article you are most proud of and think will be most appreciated by those interested in your area of professional activity.
You can also use various types of media to attract attention to your page. In today’s fast-paced world, people often prefer to watch a short and engaging video rather than taking their time to navigate through a long and detailed article. If you do decide to post video content, however, just make sure the production is on point (even if you record it yourself, on a smartphone for example, you can still make sure that the camera is well-focused and the audio sounds good). Always ensure that your presentation is friendly and engaging whilst remaining appropriately professional.
Finally, you should definitely consider adding hashtags to your article to ensure it gets as much exposure as possible across the network as a whole. Add up to three hashtags to any article and you should make these broad enough to ensure that a lot of people who are interested in your field will see them but also not so broad that they will get swamped by other articles on the site (although broad hashtags WILL get more exposure so you will need to play around and experiment in order to develop a strategy that works for you in this area!).
4. Let LinkedIn Help you Out with Quality Third-Party Content
In addition to sharing your own content, LinkedIn allows you to leverage high-quality, curated content from others by displaying it directly on to your company page. This can help to let prospective clients know what your company values and will help to associate your brand with other high-quality enterprises in your prospects’ minds.
In order to make use of this feature on your company page just go to ‘Content’ in the top navigation menu. Here you will see content that LinkedIn suggests might be appropriate to share on your page.

LinkedIn will ask you to define your audience before you start re-posting suggested articles on your page and it will give you a variety of options to choose from allowing you to define who will see your posts; such as “All LinkedIn Members”, people in specific industries, people in certain locations, etc. Choose the most appropriate option for your business needs and target demographic. (Bear in mind that LinkedIn will want your prospective audience size to be at least 300 users).
After you have defined your audience, LinkedIn will now allow you to choose content to re-post for them. You can either use the content search bar to find specific articles to share on your company page or else you can make use of the content that LinkedIn selects for you.
LinkedIn provides you with some essential information about all the articles it suggests: name of the article, the engagement rate, and topic keywords to help you to make an appropriate decision of which articles you’d like to share. Try to pick articles that you think will both capture your target audience’s interest and will best show-off your business’s professional expertise in order to help increase engagement with your page.
5 Prompt Clients to take the next steps with a Call to Action Button
It’s all well and good creating a dazzling Company Page on Linkedin but, ultimately, your main purpose is to convert prospects into leads and to help drive customers to your business. Luckily, LinkedIn makes it incredibly easy to do so by giving you the option to easily integrate a call to action (CTA) buttons onto your company page, giving other users the ability to engage further with your business, make enquiries, or purchase products off the site.
You might want to give your prospects the ability to register with you, sign up for a service or visit your business website – with CTA buttons you can do all of these things and more!
In order to add a new button to your page, first click on the ‘Edit Page’ button located at the top right of your company page.

Now navigate to the ‘buttons’ list and turn on the ‘custom button’ slider.
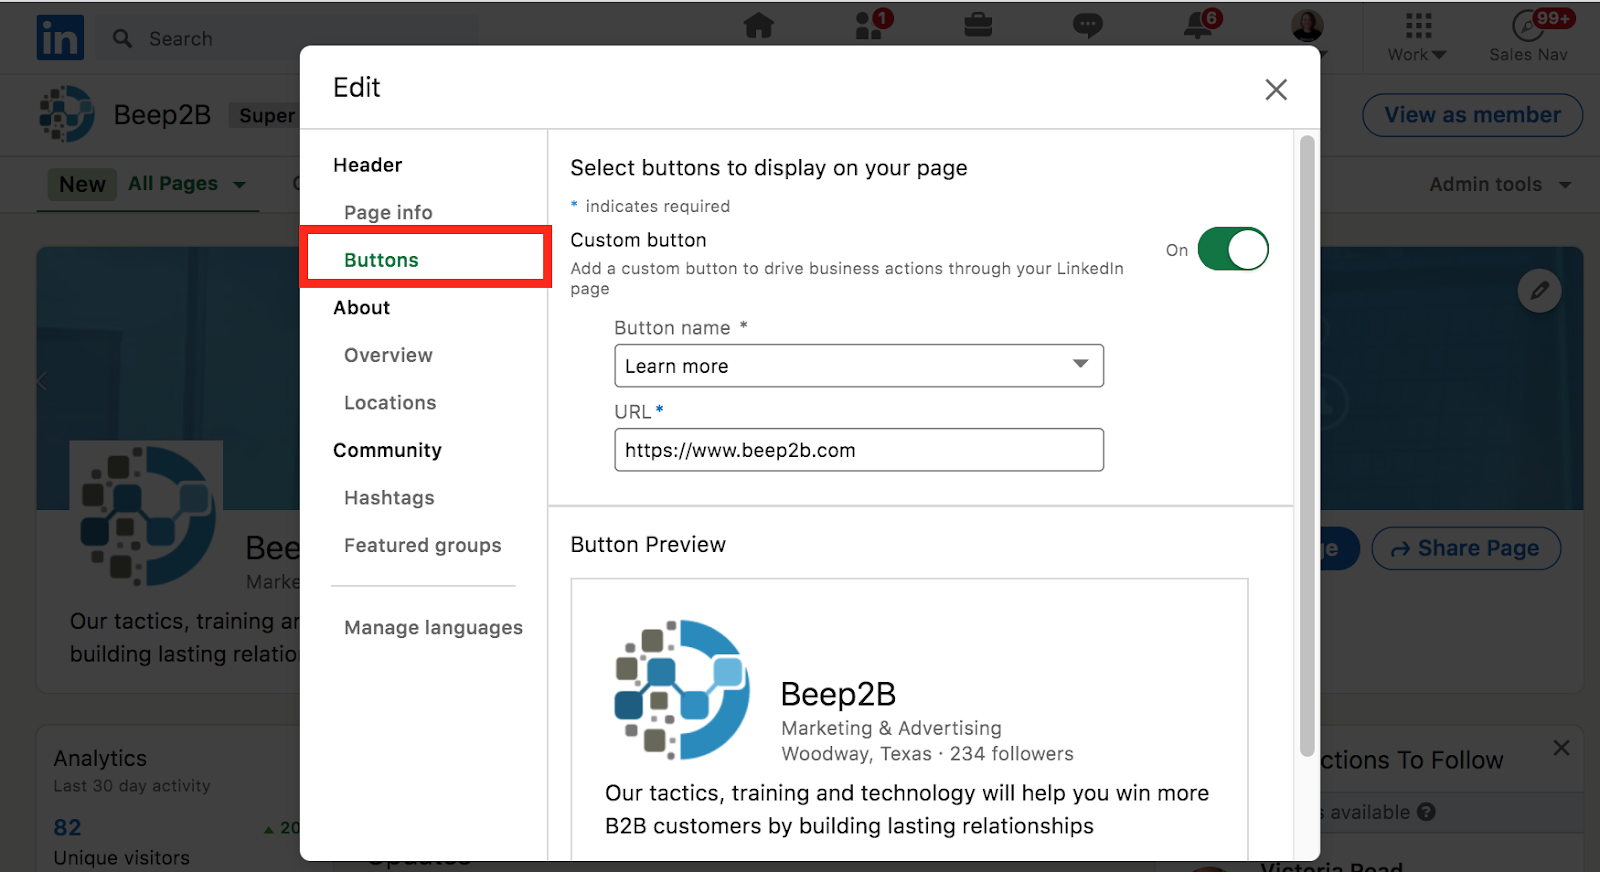
Finally, choose the appropriate button from the list that now appears. LinkedIn lets you add your own link underneath the button’s name so that the button will be able to take users wherever you want them to go.
Once you have finished setting up your button you simply need to remember to turn it on and it will now be activated and available to users on your LinkedIn Company page!
Conclusion
After following these simple steps you should have created a fully functioning Company Page on LinkedIn – or else optimised an existing one. Remember to keep checking in on your company page and updating it with fresh content to ensure that it continues to drive interest across the platform. Also, make sure to link back to it on any other professional sites you have elsewhere on the web and, if you work with any employees or colleagues, remember to invite them to connect and engage with the page as well to help to grow its reach and impact!